

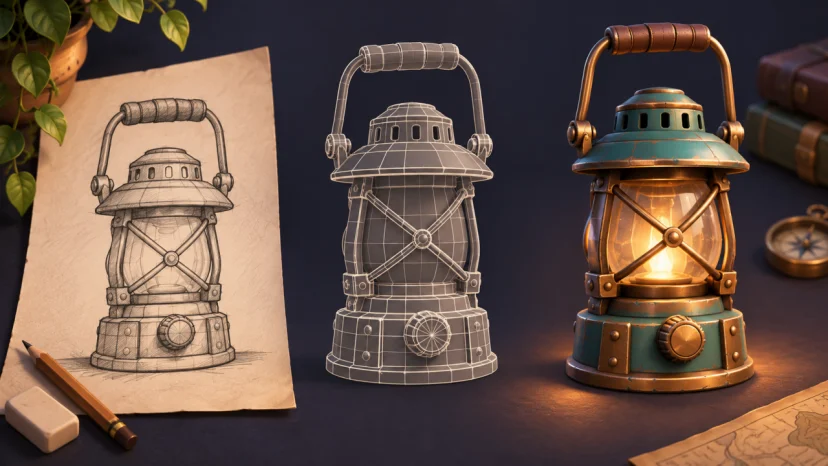
A good game prop tells a story before a player touches it. A battered explorer lantern might suggest an abandoned campsite, a cautious traveler or a route into the dark. N4D gives creators a way to begin turning that kind of original reference image into a three dimensional model, with the creative decisions still belonging to the person building the scene.
For an indie developer working from their own sketch, a 2D to 3D converter can provide a starting mesh to inspect and develop. The useful question is what happens next: does the prop communicate its purpose, fit the game and remain manageable when it leaves the generation tool?
Give the prop a job in the scene
Start by describing how the player will encounter the object. A lantern seen briefly across a campsite needs a recognizable outline. A lantern that fills the screen during an inspection sequence needs more attention to the handle, frame and surfaces. Those are different assignments, even when both begin with the same drawing.
Write a short brief before generating anything. Include the object’s role, approximate size relative to the character, viewing distance and visual style. Decide whether it is background dressing, a collectible or something the player carries. This keeps the work focused when an attractive variation appears that does not belong in the game.
For a first experiment, choose an original object with a clear main form. A compact lantern with a broad base is easier to judge than an elaborate machine whose important mechanisms overlap. The goal is to learn how the workflow behaves while producing something the project can actually use.
Prepare a reference that explains the shape
An image communicates appearance, but it does not specify every surface in three dimensions. Give the generator the clearest information available. Separate the prop from its background, preserve the complete silhouette and make important features visible. A sketch with a readable handle and body is more useful than a dramatic composition that hides half the object.
Keep perspective deliberate. A slightly angled view can explain depth, while extreme perspective can make proportions harder to interpret. Remove decorative marks that are not part of the object. If the drawing contains a cast shadow, check that it cannot easily be mistaken for an additional piece of geometry.
N4D’s image workflow lets the creator upload a reference, generate a model and review the result. Treat that first result as a proposal for the object’s volume. It is something to inspect against the brief, rather than a substitute for deciding what the prop should be.
Judge the shape before the surface finish
Rotate the model and compare its outline from several directions. Does the lantern remain recognizable from the side? Does its handle connect where expected? Is the base proportionate to the body? A pleasing front view can hide a shape that feels awkward from the player’s normal camera angle.
Pay particular attention to surfaces that were hidden in the reference. A single drawing cannot fully describe the back, underside or interior. Those regions deserve an intentional design decision. Keep useful interpretations and correct details that contradict the story or construction of the object.
Then place the prop beside a simple character or environmental reference. It may look convincing alone and still feel oversized in a doorway. Test the camera distance the game will use, too. Small ridges that look impressive in a close preview may contribute little once the prop occupies a small part of the screen.
Develop the asset for its intended use
A starting model and a finished game asset serve different purposes. The next steps depend on the game, the target hardware and the way the object behaves. Avoid assigning the same preparation process to every generated prop.
Keep the mesh appropriate to the scene
Inspect the geometry in the modeling software used by the project. Look for unnecessary pieces, awkward intersections and dense areas that add little to the visible shape. Set a performance budget with the rest of the scene in mind, rather than choosing a polygon count because it sounds professional.
If the lantern will open or swing, decide which parts must move independently. A single mesh that works for a static background prop may need further modeling for that interaction. Plan those changes explicitly. Image generation does not decide how a game object should be assembled or animated.
Make materials work under game lighting
Use the project’s actual lighting to judge the surface treatment. The warm metal and painted body might read clearly in a bright preview but merge into one dark shape in a cave. Test the prop in the scene before polishing details that the player will never see.
When using textured exports, check that the intended material information arrives in the receiving application. Keep the files together and inspect the model after import. A successful download is only one step in the handoff, and the receiving software may require its own material setup.
Run a small in game test
Import a working version into the project’s game engine and give it a simple placement test. Check its orientation, size and position. If the object needs collision or interaction, set those up within the engine and test them with the same care used for a manually modeled prop.
For the lantern, a useful test might include a tabletop placement, a darker campsite and a close inspection camera. Record what fails in each situation. A handle that disappears at a distance calls for a different change from a material that reflects too strongly under a nearby light.
Keep the first export and the revised version clearly named. Notes such as “wider handle for distant view” explain why the model changed and help prevent an older asset from returning to the scene by mistake. Stop iterating when the prop meets its brief, rather than waiting for every preview to feel perfect.
Let the workflow support the creative idea
The real value of starting from a sketch is the continuity between the drawing and the game world. The creator can spend the review process asking whether the object belongs in the scene, what it suggests about the setting and how the player will use it.
N4D can help turn an original image into a model worth developing. A clear brief, careful shape review and a small in game test give that model a practical route into the project, with the final artistic and technical decisions made where they matter.

Amanda Dudley is a lecturer and writer with a Ph.D. in History from Stanford University. After earning her doctorate in 2001, she decided to pursue a fulfilling career in the educational sector. So far, she has made giant strides by working as an essay writer for EssayUSA, where she delivers high-quality academic papers to students who need them.