
Got an almost perfect photo? Maybe a stray tourist wandered into your vacation shot, or you wish you could change the color of your shirt with a single click. In the past, fixing these issues meant spending hours learning complex software. Today, you can do it in seconds.
AI-powered photo editing is here, and it’s completely changing how we create and refine images. Two of the most useful tools at your disposal are image-to-image generation and one-click object removers. This guide will walk you through exactly how to use these tools to transform your pictures, clean up messes, and unlock your creative potential in 2026.
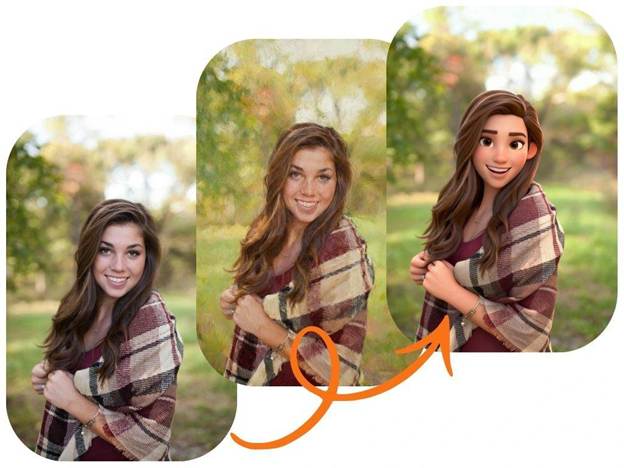
What is Image to Image AI?
You’ve probably heard about AI that creates images from a text description. Image-to-image AI is the next step. Instead of starting with a blank canvas, you start with an existing photo. You then provide the AI with a text prompt telling it what to change, add, or transform within that specific picture. It’s a powerful way to direct the AI’s creativity with precision.
This technology allows you to reimagine your photos entirely. You can change a daytime scene to a starry night, turn a photo into a watercolor painting, or even swap your casual t-shirt for a business suit. A sophisticated Image to Image AI tool gives you the control to make targeted, high-quality edits that would have been impossible just a few years ago. It’s less about generating something random and more about refining your own vision.
The Magic of One-Click Photo Cleanup
Sometimes you don’t need to transform a photo; you just need to tidy it up. Photobombers, distracting trash cans, ugly power lines, or even a smudge on your camera lens can ruin an otherwise great shot. This is where AI object removal tools come in. They let you erase unwanted elements from your photos as if they were never there.
These tools are designed for simplicity and speed. You simply highlight the object you want to remove, and the AI intelligently reconstructs the background behind it. What used to require careful cloning and patching in professional software now takes just a few seconds. Using a Free Magic Eraser is one of the fastest ways to fix visual clutter and produce clean, professional-looking images for your social media, website, or personal collection.
How to Use Image-to-Image AI: A Step-by-Step Guide
Ready to start transforming your photos? It’s easier than you think. Follow these simple steps to get incredible results.
Step 1: Choose Your Base Image
Start with a photo that is clear and well-lit. The better the quality of your original image, the more detail the AI has to work with. Think about your goal. If you want to change the background, pick a photo where the subject is clearly defined. If you want to alter clothing or an object, make sure it’s in focus.
Step 2: Write a Clear and Descriptive Prompt
This is the most important part of the process. Your text prompt is your instruction to the AI. You need to be specific and clear to get the result you want.
* Bad Prompt: “Make it look better.”
* Good Prompt: “Change the background to a sunny beach with palm trees.”
* Bad Prompt: “Add stuff.”
* Good Prompt: “Add a vintage leather backpack on the subject’s back, realistic photography style.”
Think about the style, color, lighting, and specific objects you want to see. The more detail you provide, the closer the AI will get to your vision.
Step 3: Upload and Generate
Upload your chosen image to the AI tool. Paste your carefully written prompt into the text box. Many tools also have settings you can adjust, like “style strength,” which tells the AI how much it should stick to your original photo versus your prompt. Once you’re ready, hit the generate button.
Step 4: Review and Refine
The first result might not be perfect, and that’s okay. AI generation is an iterative process. Review the image and think about how you could improve your prompt. Maybe you need to be more specific about the color, or perhaps you want to add a detail you forgot. Tweak your prompt and generate again. Don’t be afraid to experiment until you get something you love.
Cleaning Up Photos with a Magic Eraser
Removing unwanted objects is even more straightforward. Here’s how you can clean up any photo in under a minute.
Step 1: Identify What You Want to Remove
Look at your photo and decide exactly what needs to go. Is it a person in the background? A distracting sign? A blemish on a portrait? Knowing your target will make the process quick and easy.
Step 2: Upload Your Photo
Open the magic eraser tool and upload the image you want to edit. The tool will typically load it into a simple editor interface.
Step 3: Highlight the Unwanted Object
The tool will provide you with a brush. You can usually adjust the size of the brush for better precision. Carefully “paint” over the entire object you want to remove. For best results, zoom in on the photo and make sure you cover the whole object without highlighting too much of the background you want to keep.
Step 4: Let the AI Work
Once you’ve highlighted the object, simply click the “Erase” or “Remove” button. The AI will analyze the surrounding pixels and intelligently fill in the space where the object was. It creates a seamless background that looks completely natural.
Step 5: Download Your Perfected Photo
After a few seconds, the tool will present your cleaned-up image. If you’re happy with the result, you can download it directly to your device. The photobomber, trash can, or blemish is gone for good.
Creative Use Cases for AI Photo Editing in 2026
These tools aren’t just for fixing mistakes. They open up a world of creative possibilities for everyone, from business owners to hobbyists.
For Social Media Content Creators
Create stunning and unique visuals that stop the scroll. You can use image-to-image AI to develop a consistent visual theme for your feed, like turning all your photos into a specific art style. You can also use a magic eraser to ensure every product shot or lifestyle photo is clean, on-brand, and free of distractions.
For E-commerce Businesses
Product photography is essential for online sales. Use a magic eraser to remove props, supports, or imperfections from your product shots, resulting in a clean, uniform look for your store. With image-to-image AI, you can place your product in various settings or change background colors to match marketing campaigns without needing expensive photoshoots.
For Personal Projects and Fun
Finally, you can remove an ex from that great photo you love. Or, you can fix old, scanned family photos by erasing scratches and blemishes. You can also have fun by turning portraits of friends and family into fantasy characters or placing them in famous movie scenes. The only limit is your imagination.
For Real Estate Agents
First impressions matter. Use a magic eraser to remove clutter, vehicles from the driveway, or distracting elements from property photos. This helps potential buyers focus on the home itself. For more advanced use, image-to-image AI can be used to stage rooms virtually or even change the weather in an exterior shot to a perfect sunny day.
Tips for Getting the Best Results
To make sure you get amazing results every time, keep these best practices in mind.
* Start with High-Resolution Images: The higher the quality of your source photo, the better the final result will be. A clear image gives the AI more data to work with.
* Be Incredibly Specific with Prompts: As mentioned before, detail is everything. Use descriptive adjectives and specify the style you’re aiming for (e.g., “photorealistic,” “oil painting,” “anime style”).
* Combine Tools for a Pro Workflow: Don’t be afraid to use multiple tools on one image. Use a magic eraser first to clean up any distracting elements. Then, upload the clean version to an image-to-image tool to apply creative transformations.
* Iterate and Experiment: Your first try is rarely your last. Play with different prompts and settings. Sometimes a small change in wording can lead to a dramatically different and better outcome.
The Future of Your Photos is Here
AI photo editing tools have leveled the playing field, giving everyone the power to create professional-quality images. Whether you want to transform a picture into a piece of art with image-to-image AI or simply clean up a great memory with a magic eraser, the technology is simple, fast, and incredibly effective.
Stop letting minor imperfections ruin your favorite photos. Start exploring these tools today and see just how easy it is to bring your creative vision to life.

Amanda Lancaster is a PR manager who works with 1resumewritingservice. She is also known as a content creator. Amanda has been providing resume writing services since 2014.


