
Character key art arrives as one still, and the thumbnail editor still has to move the hair, drop the costume against a new backdrop, or pull the face forward for a recap image. The studio file that built that still is usually somewhere else. What you have is a JPG of a finished pose. Turning that pose into pieces you can hide and slide is the job of an image to layers pass aimed at character art, not at a product packshot.
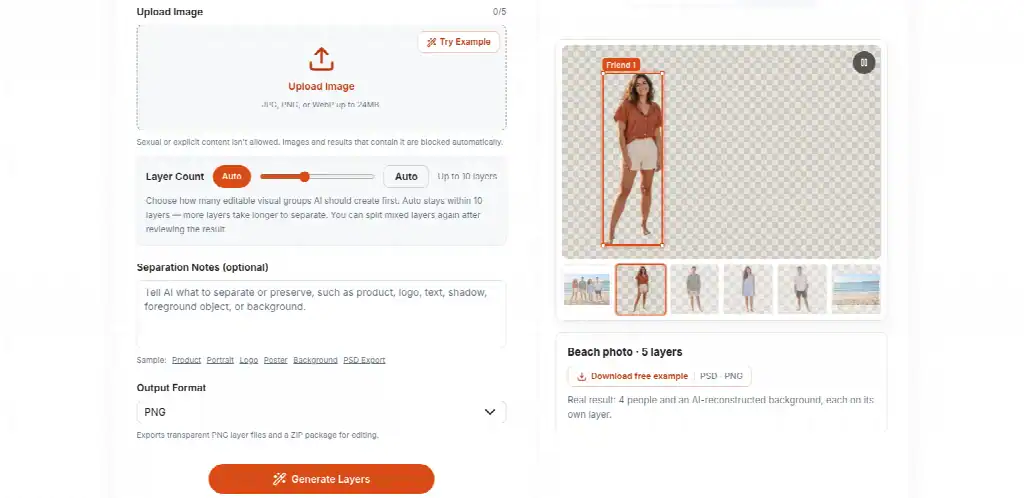
Thumbnail editors on a recap desk do not need a new illustration. They need the existing still to survive a crop that the poster was never drawn for. Hair that touches the title safe area, a weapon that crosses the lower third, a cape that should sit behind a caption: each of those is a grouping problem. Image2Layer is the workspace that offers two modes for that grouping, a layer-count control that stays inside ten groups, and an optional note field for the piece you care about most.
Start From The Still You Actually Have
Start with the file in hand, not the file you wish the concept artist had sent. JPG, PNG, and WebP are the accepted uploads, up to 24 MB, and the short side of the brief is 512 by 512 pixels. A compressed social still can meet that floor and still be a bad source, because the edges you need were already crushed. If the only copy is a 400-pixel crop, do not upscale it and hope. Ask for the larger still first.
The site’s own character path talks about hair, face, and clothing landing on their own layers. That is the right ambition for key art and the wrong ambition for a crowd scene. One hero, one costume, one backdrop is a stack a thumbnail can use. Twelve extras in matching armor will come back as a clump, and you will spend the time splitting them by hand anyway.
Hair Face And Costume As Separate Groups
Name the groups before you upload, even if you only write them on a scratch line. For a typical hero still the useful groups are the face, the hair or headpiece, the costume, a prop, and the background. If the pose includes a cast shadow on the ground, that shadow is its own group, not a stain on the costume. The point of naming them is to notice when two of them must stay together. A visor that is part of the face should not be peeled off just because a control allows it.
Pick Detailed Layers Or One Target
The mode control has two settings, and they are not synonyms. Detailed Layers automatically separates the image into multiple editable layers. Targeted Layer extracts one selected layer, such as the subject, the product, a logo, a shadow, or the background. On a character still, Detailed Layers is the default when you need hair, costume, and ground at once. Targeted Layer is the shorter path when the backdrop is the only piece that has to go, and the hero should remain a single locked figure.
Choosing the broad mode on a still that only needed a backdrop creates extra pieces you then have to reassemble. Choosing the single-target mode when the hair must move independently leaves you with one cutout and the same problem you started with. Match the mode to the edit you already know you will make in the thumbnail.
Set The Layer Count Before You Wait
Layer Count sits next to the upload, and Auto is the setting that stays within ten layers. The note under that control is specific: Auto stays within ten layers, more layers take longer to separate, and you can split a mixed layer again after you review the result. Ten is a ceiling, not a suggestion that every still contains ten meaningful objects.
A hero portrait with a clean backdrop may only deserve four or five groups. Asking for the ceiling because the control allows it produces slivers: one layer that is only a highlight on the cheek, another that is a fold of cloth you will never move. Those slivers cost review time. Set the count to the groups you named, then wait. The public timing for a run is about 60 to 120 seconds, which is long enough to do something else and short enough that a wrong count is a second run, not a lost morning.
Leave Auto Inside The Ten Group Ceiling
If you leave the count on Auto, treat ten as the maximum the first pass will attempt, not as the number you will keep. After the stack appears, hide every layer once. Anything you cannot name in a few words is a candidate to merge back or to ignore. The thumbnail does not get better because the layer panel is taller.
Split A Mixed Layer On A Second Pass
The useful second pass is the one the control already describes: split a mixed layer after you have seen it. Hair stuck to a hood, or a sword stuck to the arm that holds it, is a mixed group. Run the split on that group rather than redoing the whole still with a higher count. You keep the pieces that were already clean, and you only spend attention on the clump.
Write Notes For The Part That Matters
Separation Notes is an optional field, and it is where a character job differs from a generic upload. The image-to-PSD guidance says quality improves when you choose a layer count that matches the image and add notes for the parts you care about most. On key art, that note should name the fragile edge, not praise the character. “Keep the braid separate from the cloak” is a note. “Make it cinematic” is not.
Write one instruction. If you list every button, every scar, and every background lantern, the note stops being a priority and becomes a second brief the model will only partly follow. The braid against the cloak is the priority because that edge decides whether the hair can cross a caption. The lanterns can stay in the background layer.

This is also the moment to send the stack toward an image to psd export if the next person opens Photoshop, Photopea, GIMP, or Affinity Photo. The container matters less than the review you are about to do. A PSD that is one locked bitmap has not finished the job, even if the extension looks right.
Export A Stack You Can Hide And Move
Image2Layer describes the output as raster layers you can inspect, hide, move, and reuse, with transparent PNG layers or a ZIP as the other packaging. For a thumbnail, hiding is the test. Hide the background. The hero should still read. Hide the hair. The face should not lose an ear. Hide the prop. The hand should not have a hole in the shape of the sword unless the sword was occluding it and the rebuild failed.
Move one piece a short distance, then move it back. You are not designing the final crop yet. You are checking that the piece is independent. If the cloak drags a stripe of the backdrop with it, that stripe is a failure of the group, and the layer is not ready for the recap template. Reject that piece and split it, or paint the stripe out. Do not ship the stripe because the rest of the still looks fine.
Check Soft Edges Before The Thumbnail Ships
Soft edges are the documented hard part: hair, fur, glass, smoke, and motion blur all obscure the boundary between one layer and the next. Character key art lives in that list. A braid, a fur collar, a visor, a smoke plume behind a cape, a motion streak on a weapon. Low-resolution files, heavy compression, and elements that share a color with the background separate less cleanly. A busy collage usually needs a manual tidy after export.
Run this check before the still goes into the shared recap folder:
-
Solo the hair or fur and look for a halo of the old backdrop along the edge.
-
Solo glass or a visor and see whether the face behind it survived as its own piece or got eaten.
-
Solo smoke or a motion streak and decide whether it is a layer or a smear that should stay with the background.
-
Turn every layer back on and compare the stack with the original still at the same crop. The pose should match. A melted shoulder or a second outline on the jaw is a reject.
A halo you can see at thumbnail size will be obvious on the homepage module. Fix it or drop back to the original still and crop more conservatively. The stack is a convenience, not a pardon for a dirty edge.
What The Still Can Become After Export
A clean stack lets the recap desk move a hero inside a template without redrawing the pose. It does not invent a new costume, restore a vector logo, or replace the art director’s crop. Image2Layer is the right stop when the still is the only asset and the edit is “separate these groups, then hide or slide them.” It is the wrong stop when the frame is a crowd, the only file is a tiny compress, or the edge that matters is smoke you already know will clump.
Keep the original still next to the export until the thumbnail is approved. If a group fails the solo check, the still is still publishable as a crop. The layer file is the optional path, and it earns the path only when the hair, the costume, and the ground can move without dragging each other along.

Susan Wallace is a pro gamer and has been a strong influence over the gaming community. She also writes about the positive effects of gaming and how to avoid the negative effects of gaming. Her amazing writing has reached and helped many gamers. She actually helps people decide the best games to play based on their current situation.